


In stock
In stock

In stock
| Brand | FXC |
|---|---|
| Type | MINI PC |
| Most Suitable For | Gaming , Office |
| Series | Intel Alder Lake-N100 |
| RAM Size | 16 GB |
| Operating System | Windows 11 Pro |
| GPU | Intel UHD Graphics |
| Storage Type | SSD (Solid State Drive) |
| Processor | Intel Celeron N |
| Release Year | 2023 |
| SSD Capacity | 512 GB |
| CountryRegion of Manufacture | China |
| Manufacturer Warranty | 5 Years |
In stock
In stock
In stock
| Weight | 5 lbs |
|---|---|
| Standing screen display size | 23.8 Inches |
| Screen Resolution | 1920×1080 |
| Max Screen Resolution | 1920 x 1080 Pixels |
| Brand | HP |
| Item model number | 24mh |
| Item Weight | 9.94 pounds |
| Product Dimensions | 8.33 x 23.54 x 18.28 inches |
| Item Dimensions LxWxH | 8.33 x 23.54 x 18.28 inches |
| Color | Jet Black |
| Voltage | 240 Volts (AC) |
| Manufacturer | Hewlett Packard Office |
| Country of Origin | China |
| Date First Available | September 6 , 2020 |
In stock
In stock
| Weight | 5 lbs |
|---|---|
| Brand | Holy Stone |
| Model Name | hs175d |
| Special Feature | GPS Auto Return , Brushless Motors , GPS Follow Me , No Need FAA/Remote ID , Drones with Camera for Adults 4K |
| Age Range Description | 14 |
| Color | Black |
| Video Capture Resolution | 4K |
| Connectivity Technology | Wi-Fi |
| Skill Level | Beginner |
| Item Weight | 4.2 ounces |
| Battery Capacity | 12.9 Watt Hours |
| Video Capture Format | 4k |
| Control Type | Remote Control |
| Media Type | SD |
| Wireless Communication Technology | Wi-Fi |
| Battery Cell Composition | Lithium Polymer |
| Are Batteries Included | Yes |
| Product Dimensions | 14.2"L x 11.8"W x 2.8"H |
| Country of Origin | China |
| Manufacturer recommended age | 14 years and up |
| Batteries | 2 Lithium Polymer batteries required. (included) |
| Manufacturer | Holy Stone |

In stock

In stock
In stock
In stock
In stock
In stock
In stock
In stock

In stock
| Weight | 5 lbs |
|---|---|
| Brand | UPERFECT |
| Screen Size | 15.6 in |
| Maximum Resolution | 3840 x 2160 |
| Features | Built-in Speakers , Headphone Jack |
| Video Inputs | HDMI Mini , USB-C |
| Product Line | 4K Portable Monitor Screen 15.6" |
| Brightness | 350 cd/m² |
| Contrast Ratio | 1000:1 |
| Display Type | IPS LCD |
| Aspect Ratio | 16:9 |
| Refresh Rate | 60 Hz |
| Response Time | 3 ms |
| Color | Black |
| Model | UColor A27 |
| MPN | Does Not Apply |
| Energy Star | 10 Stars |
| EC Range | A+++ – G |
| CountryRegion of Manufacture | China |
| Most Suitable For | Serious Gaming , Casual Computing , CCTV , Gaming , Graphic Design |
| Item Length | 357MM |
| Item Width | 228MM |
| Item Height | 10MM |
| Manufacturer Warranty | 1 Year |
| Fit For | For XBOX ONE S , XBOX ONE , PS4 , PS3 , Xbox 360 |
| Fit For 2 | For PS4 , PS3 , Xbox 360 , Raspberry Pi,PC,FPV |
| Built-in Speakers | Yes |
| Touch Screen | No |
| Built-in Battery | No |
| VESA | No |
| Auto Rotate | No |
| UPC | Does not apply |
No account yet?
Create an Account Out of stock


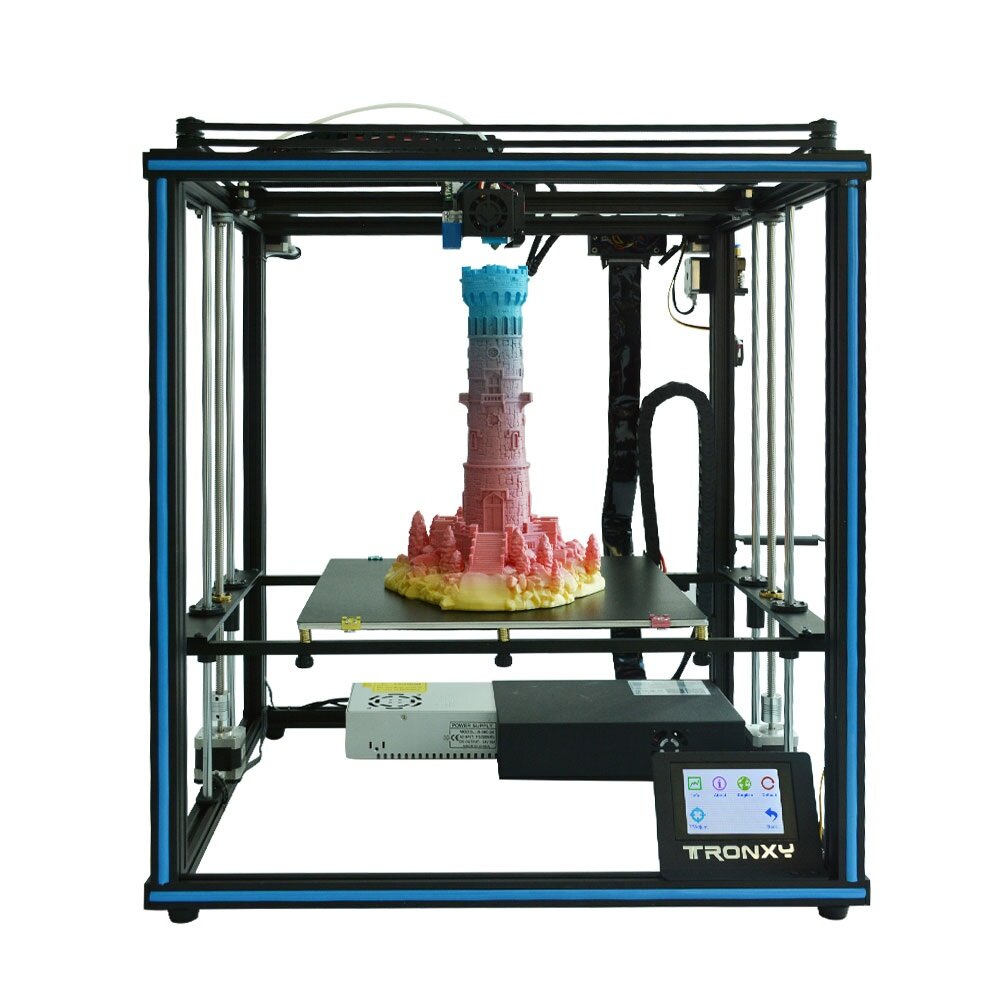
2 reviews for TRONXY® X5SA-400 DIY 3D Printer Kit – Large Printing Size 400*400*400mm – Touch Screen Auto Leveling – Available for EU/US Shipping
Clear filtersThere are no reviews yet.